Start with SHiNeMaS
User Reference Guide
Part II: Use SHiNeMaS tools to prepare submission files
Prepare and submit a sowing file
Preparing a file can be a really tedious work especially if you manage a lot of data with many seeds lots (we had only 6 in the previous example). Thus, SHiNeMaS provides some useful tools to help in the preparation of the files. Go in Prepare & Upload file > Prepare files > Reproduction. Here you have a simple form were you can for example filter on ‘PEM’ location and the year 2014.
Prepare reproduction file
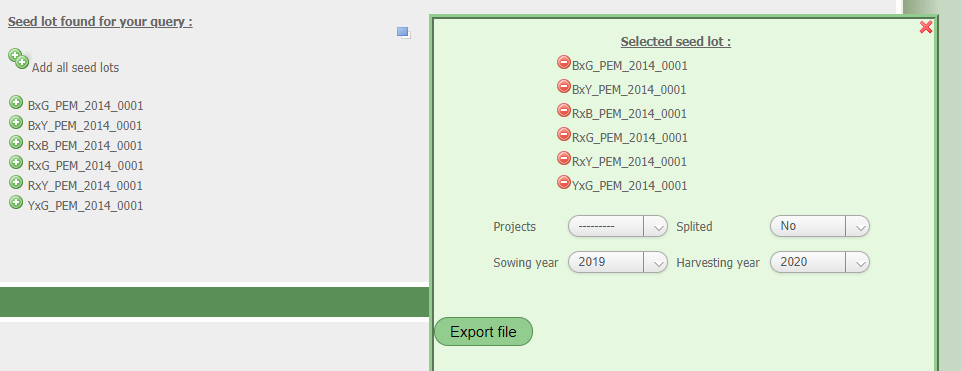
A list of seeds lots is displayed you can click on ‘Add all seed lots’ shortcut to add all seeds lots to the list of exported lots. Click on the blue icon on the right to display the list of selected seeds lots. Then fill the form with project PPB, split at ‘Yes’, sowing year 2014 and harvesting year at 2015, then export the file.
Move this file in the ‘tutorial data’ folder and rename it ‘03-reproduction_2014-2015.csv’. Open the file with LibreOffice as you can see, the file is already fill for most of the column (project, sown_year, harvested_year, id_seed_lot_sown. It remains for you to fill the columns quantity_sown, quantity_harvested, X and Y.
We will also fill data on sowing_density and sowing_type like in the previous step. Data are available, open the file ‘03-reproduction_data_2014-2015.csv’ and copy/past the data in your reproduction file. You can note that this time we filled the date of the measure (there is two more columns with the variable name followed by the tag ‘$date’). The method file is also available (03-reproduction_method_2014-2015.csv). Go on the submission form and submit your file with the method file. The report is now displayed, choose the reproduction method as described previously and submit!
Prepare and submit an existing reproduction file
Until now we saw how to submit a reproduction file describing the sowing, the plot organization etc. But all the measures are not done at the same time, for example we want now have an estimation of thousand kernel weight (tkw) and we don’t want to wait until the harvesting to load some data in SHiNeMaS.
That’s not a problem, the first file has been submitted now the reproductions and the measures on sowing_density and sowing_type also are recorded in the tool, we can use this reproduction to prepare a new file, an ‘existing reproduction’ file. This is exactly the same file and the same process. In fact, when you submit a reproduction file in SHiNeMaS the tool checks if something is already growing in the plot, if no SHiNeMaS creates a new reproduction, if yes SHiNeMaS will check that the information in the file are the same than the ones recorded, if yes you can add new data measured (like tkw).
So now, go in the Prepare & Upload file menu, Prepare files > Existing Reproduction. Use the same filters than the previous chapter. You can see that the list is a bit different the seed lot name is followed by the plot location in the field. That means we are not talking about just a seed lot but a seed lot that have been sown, a reproduction. As previously add all to the list, open the windows thanks to the blue icon and export the file. Note that this time you can’t fill the project, sowing year etc. That’s normal, this information is already recorded.

Prepare existing reproduction file
Move this file in the ‘tutorial data’ folder and rename it 04-reproduction_2014-2015.csv. Open it and the one named 04-reproduction_data_2014-2015.csv and copy/past the data related to ‘tkw’ variable. The method file is also available. Now you know the process, go to the submission form, check Reproduction, select ‘Wheat’ and load your file with the method file in SHiNeMaS.
Prepare and submit an individual data file
Describing sowing at plot level is something interesting, but plot level is not enough when you need to make some measures on a plant, at individual level. You can do this with SHiNeMaS, in the same spirit of existing reproductions you will be able to prepare an individual data file. Still in Prepare & upload files > Prepare files, select Individual data menu. Select the same filters than previously (location = PEM, year = 2014) and add all the reproductions. When you open the window with the list of selected reproductions you can fill a form with the number of individual you want to measure. Let’s go for 10 and export the file.
Move the file in the ‘tutorial data’ folder and rename it 05-individual_2014-2015.csv. Open this file, as you can see each reproduction appears 10 times in the file with for each row a different individual number. At this step we will measure 3 variables on individual plants (‘height’, ‘ear_weight’, ‘awns’). You can find related data in the 05-individual_data_2014-2015.csv file copy/past the table in the downloaded file and the methods in 05-individual_method_2014-2015.csv file.
This time in the submission form check ‘individual data’ when submitting your file with the method file. The report should display a “submission successful” message, that’s all because during this submission the tool didn’t created new germplasm, seed lot, variable or relation. It only recorded new data related to existing relations and it is not reported in detail.
But we will see that, despite this short message, SHiNeMaS worked a lot. From the global search bar access to the card of the relation ‘RxY_PEM_2014_0001 –> RxY_PEM_2015_0001’. This card displays information related to a relation. Especially, it shows the data table above. Click on the links ‘Individual data’ and ‘Global data’ to display the tables. You can download these tables by clicking on the floppy icon on the left of the link.
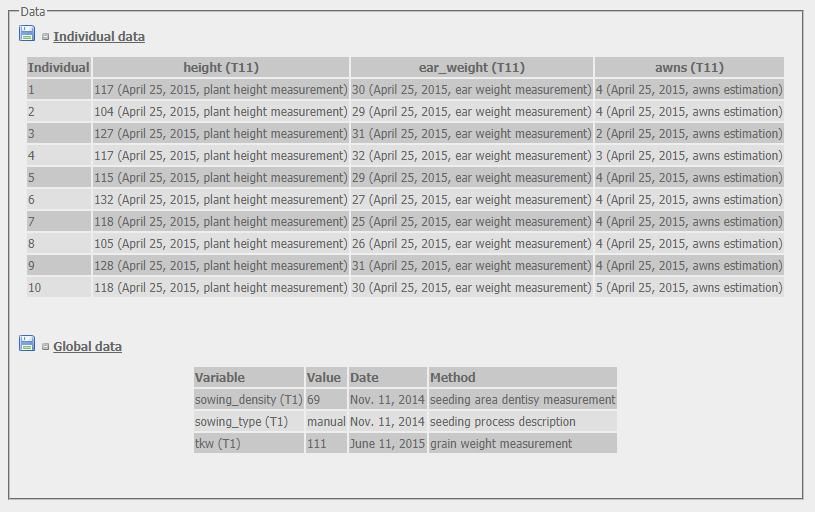
Data table from relation card
Prepare and submit a diffusion file
Now, regarding our scenario, Peter will send seeds lot of his 6 populations to Steve and John. Let’s go again in Prepare & Upload files > Prepare files, this time select Diffusion. Filter on the year 2015 and location is still PEM. The list of seeds lots appears as usually, but you can see on the right a select box. Before adding the seed lot to the list you can define here where you want to send it. Thus, select ‘JOD’ in the list, for John Doe, and click the add all button, then change the select box to STS for Steve Smith, and click again the add all button. Have a look to your list, you should have 12 row selected. In the form select 2015 for the event year, PPB project and split at ‘Yes’ and then export the file.
Prepare diffusion file : select destination of seed lot
Move the file in the ‘tutorial data’ folder and rename it 06-diffusion_2015.csv, open the file, you only have to fill the column ‘quantity’. We don’t have data to link to these relations so you can use the 00-template_methods.csv file which is an empty method file. Go to the submission form check ‘Diffusion’, select ‘Wheat’ species and then submit your file with the method file.
You are ready for the next step !